A good bathroom mirror is just a reflective surface, but a vanity with mirror and lights? That’s a game-changer. Proper lighting at the sink transforms your morning routine, makes makeup application accurate, and adds real value to your bathroom. Whether you’re upgrading an existing vanity or installing one from scratch, choosing the right mirror and light combination matters more than most homeowners realize. This guide breaks down everything you need to know to select, install, and maintain a lighted vanity that works for your space and lifestyle.
Table of Contents
ToggleKey Takeaways
- A vanity with mirror and lights eliminates shadows and improves accuracy for shaving, makeup, and grooming tasks that are impossible to perform properly under standard overhead lighting alone.
- LED-backlit mirrors are energy-efficient and create soft, ambient light by wrapping illumination around the mirror’s perimeter, with dimmable options ranging from $150–$600 depending on size and features.
- Proper lighting color temperature matters: warm light (2700K–3000K) relaxes the atmosphere, while cooler light (4000K–5000K) mimics daylight and is ideal for makeup application and detailed work.
- Installation of a lighted vanity requires securing mounts to wall studs, obtaining permits for new electrical work, and ensuring bathroom outlets are GFCI-protected to prevent electrical shock hazards.
- Aim for 1,000–1,500 lumens of light at the mirror surface and position the mirror at eye level (65–72 inches from the floor) to prevent eye strain and neck discomfort during daily grooming.
- Regular maintenance with a microfiber cloth and water-vinegar solution keeps your vanity looking fresh while protecting integrated lighting components from moisture damage in humid bathroom environments.
Why Vanity Mirrors With Integrated Lighting Matter
Bathroom lighting is often an afterthought, but poor illumination at the vanity creates daily frustrations. Without proper light, shaving becomes a guessing game, makeup goes on unevenly, and even routine grooming feels rushed. A well-lit vanity solves these problems by providing focused, shadow-free illumination right where you need it.
Integrated lighting also sets the mood for your entire bathroom. Overhead ceiling fixtures alone cast harsh shadows across your face, that’s why professionals recommend lighting from multiple angles. A vanity with mirror and lights gives you control over brightness levels and can be layered with other bathroom fixtures for balanced illumination. Beyond function, the right setup looks intentional and polished, turning a utilitarian corner into a designed space that feels complete.
Energy efficiency matters too. Modern LED-integrated mirrors consume a fraction of the power older incandescent setups required, cutting your monthly utility costs while providing superior light quality. Also, better lighting helps you maintain your vanity and mirror surfaces properly, since you can actually see what you’re cleaning.
Types of Lighted Vanity Mirrors to Consider
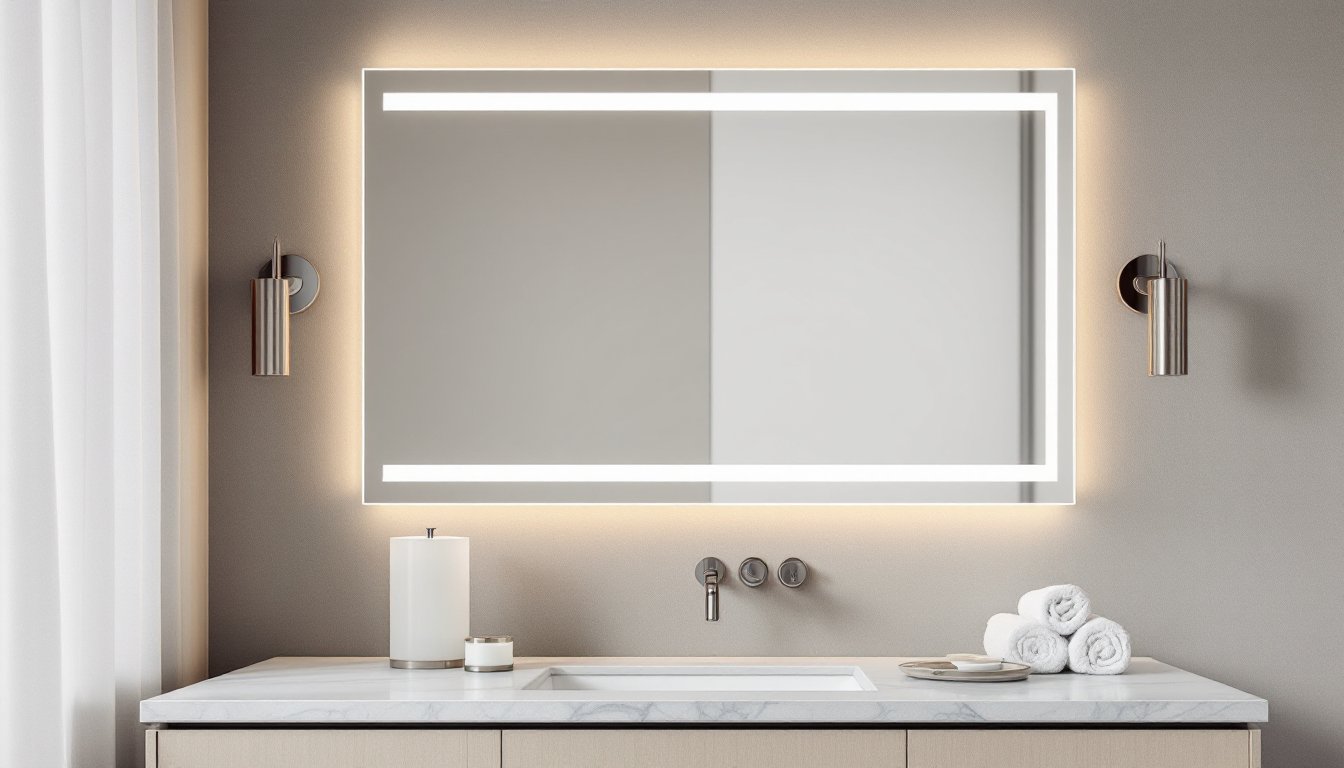
LED-Backlit Mirrors
LED-backlit mirrors mount flush against the wall and feature integrated lighting around the perimeter or behind the reflective surface. These create soft, ambient light that’s ideal for makeup application and grooming. The light wraps around the mirror, minimizing shadows on the face, the main advantage over traditional overhead fixtures.
Backlit mirrors come in various sizes, from compact 24-inch models to expansive 48-inch or larger options. Installation involves running electrical wiring behind the wall (which may require cutting into drywall) or using surface-mounted conduit if wall access is limited. Look for mirrors with dimmable LED technology so you can adjust brightness for different times of day. Expect to pay $150–$600 depending on size and features: high-end designer versions cost more.
Side-Mounted and Overhead Light Options
Sconces mounted on either side of the mirror provide flattering, even light across your face, Hollywood makeup rooms use this setup for good reason. Pair sconces with a standard mirror for a flexible approach that lets you upgrade each component separately. Overhead light bars mounted above the mirror work well in galley-style bathrooms where wall space is tight.
For a layered lighting approach, combine a decorative mirror with a vanity mirror lamp or task light positioned on the counter. This gives you adjustable, focused light for detailed work. Hanging fixtures above an island-style vanity or floating sink work for spacious bathrooms, though you’ll want adequate clearance (typically 30-36 inches above the counter for safety and function).
Don’t overlook natural light. If your bathroom has a window near the vanity, take advantage of it during daylight hours, your skin tone will appear most accurate in natural light, which helps with makeup matching and daily grooming decisions.
Installation Tips for Your Vanity Mirror Setup
Before you hang anything, locate studs in the wall, most vanity mirrors require secure mounting into framing, not just drywall anchors alone. Use a stud finder to mark stud locations, then plan your mirror position so mounting brackets align with studs at 16 or 24 inches on center.
Electrical work requires special attention. If your vanity lights require new wiring, you’ll likely need to run cable through the wall from a nearby circuit or create a new circuit entirely, this often means obtaining a permit and having a licensed electrician inspect the work. Local codes (typically the National Electrical Code, or NEC) specify outlet placement, circuit capacity, and safety requirements. In most jurisdictions, bathroom outlets must be GFCI-protected (ground-fault circuit interrupter), which prevents shock if water contacts the outlet.
For surface-mounted mirrors with integrated lights, turn off power at the breaker before connecting any wiring. Use appropriate wire gauges (typically 14-gauge for 15-amp circuits, 12-gauge for 20-amp circuits) and secure connections with wire nuts or proper connectors rated for the wire size. If you’re not confident with electrical work, hire a professional, it’s not worth the risk.
Measure twice, drill once. Mount your mirror at eye level (typically 65-72 inches from the floor to the mirror’s center) so you’re not leaning or craning your neck. Use shims if needed to level the mirror perfectly. Apply clear silicone caulk around the edges of backlit mirrors to seal gaps and prevent moisture infiltration, bathrooms are wet environments, and water damage to integrated circuitry is permanent.
Choosing the Right Lighting for Your Space
Color temperature matters more than brightness alone. Measured in Kelvin, warmer light (2700K–3000K) creates a relaxing atmosphere, while cooler light (4000K–5000K) mimics daylight and is better for makeup application and detailed grooming. Many homeowners choose a bulb vanity mirror with dimmable, adjustable-color capability, allowing them to switch between warm ambient light for evening and cool task light for morning routines.
Lumen output determines how much light reaches your face. Aim for 1,000–1,500 lumens at the mirror surface: too little and you’ll strain your eyes, too much and you’ll create glare. Most quality vanity mirror lamps deliver this range across a 24-36 inch width. Calculate lumens per area if you have a large mirror, a 48-inch mirror needs roughly double the lumens of a 24-inch one.
Consider bathroom humidity and moisture exposure. Any light fixture within 5 feet of a shower or tub must be rated for wet locations (look for “damp” or “wet” ratings on the packaging). LED fixtures are naturally moisture-resistant compared to older incandescent bulbs, which fail faster in humid environments. For kitchen island hanging lights in open-plan bathrooms or spa areas, select fixtures with proper ventilation and moisture ratings.
Budget for installation. Simple sconce pairs cost $40–$150 per fixture plus labor: integrated backlit mirrors run $150–$600: premium designer options exceed $1,000. Electrical labor typically adds $200–$500 if permits and professional installation are required. Plan your budget around electrical work complexity, not just the fixture itself.
Styling and Maintenance Best Practices
Once installed, keep your lighted vanity looking fresh by cleaning the mirror regularly. Use a microfiber cloth with a 50/50 mix of water and white vinegar, never spray cleaners directly on integrated lighting components. Wipe around sconces, light bars, and LED frames gently to avoid pushing moisture into electrical connections.
LED lights rarely burn out, but if a bulb does fail in a dimmable fixture, replace it with a bulb rated for dimmers, regular LEDs will flicker or not work at all in dimmer circuits. Keep replacement bulbs on hand matching your original’s wattage, color temperature, and bulb type (A19, candelabra, BR30, etc.).
Style your vanity counter to complement the lighting aesthetic. Clear or frosted glass containers look sharp under cool task light, while warm wood and brass accents suit warmer-temperature fixtures. A decorative tray, a small plant, or rolled towels add visual interest without cluttering the workspace. Remember: the mirror and lights are the stars, keep the counter organized so they stand out.
If you notice dimming over months or years, check for dust buildup on LED strips or behind translucent mirror panels. Gently clean these areas: dust reduces light output significantly. For integrated fixtures, annual inspection of caulking and seals prevents moisture creep, which is the main enemy of long-term performance in bathrooms. By investing in quality products and basic maintenance, a well-chosen vanity with mirror and lights will serve you reliably for 10+ years.


