Craftsman outdoor lighting brings timeless elegance and character to your home’s exterior. Unlike trendy fixtures that fade in popularity, craftsman-style lights draw from early 20th-century design principles, solid construction, honest materials, and functional beauty. Whether you’re adding fixtures to a new deck, refreshing an aging porch, or simply want your home to look inviting after dark, craftsman outdoor lighting delivers curb appeal that lasts. This guide walks you through design principles, fixture selection, layout planning, and installation so you can tackle the project with confidence.
Table of Contents
ToggleKey Takeaways
- Craftsman outdoor lighting emphasizes honest design with visible joinery, natural materials, and clean lines that draw from early 20th-century principles, creating timeless curb appeal.
- Wall sconces (12–16 inches tall), post lights (12–24 inches), and pendant fixtures should be matched in finishes and scaled to your home’s architectural details for a cohesive look.
- Effective outdoor lighting layout balances task lighting (at least 50 footcandles near doors), ambient lighting for overall ambiance, and accent lighting to highlight home features.
- Hardwired fixtures require a licensed electrician and permits in most jurisdictions, while low-voltage systems offer a safer DIY alternative for accent and ambient lighting.
- Regular maintenance—cleaning glass quarterly, replacing LED bulbs every 7–10 years, and checking weathered sealant annually—keeps craftsman fixtures looking beautiful and performing reliably.
Understanding Craftsman Outdoor Lighting Design Principles
Key Design Elements and Historical Inspiration
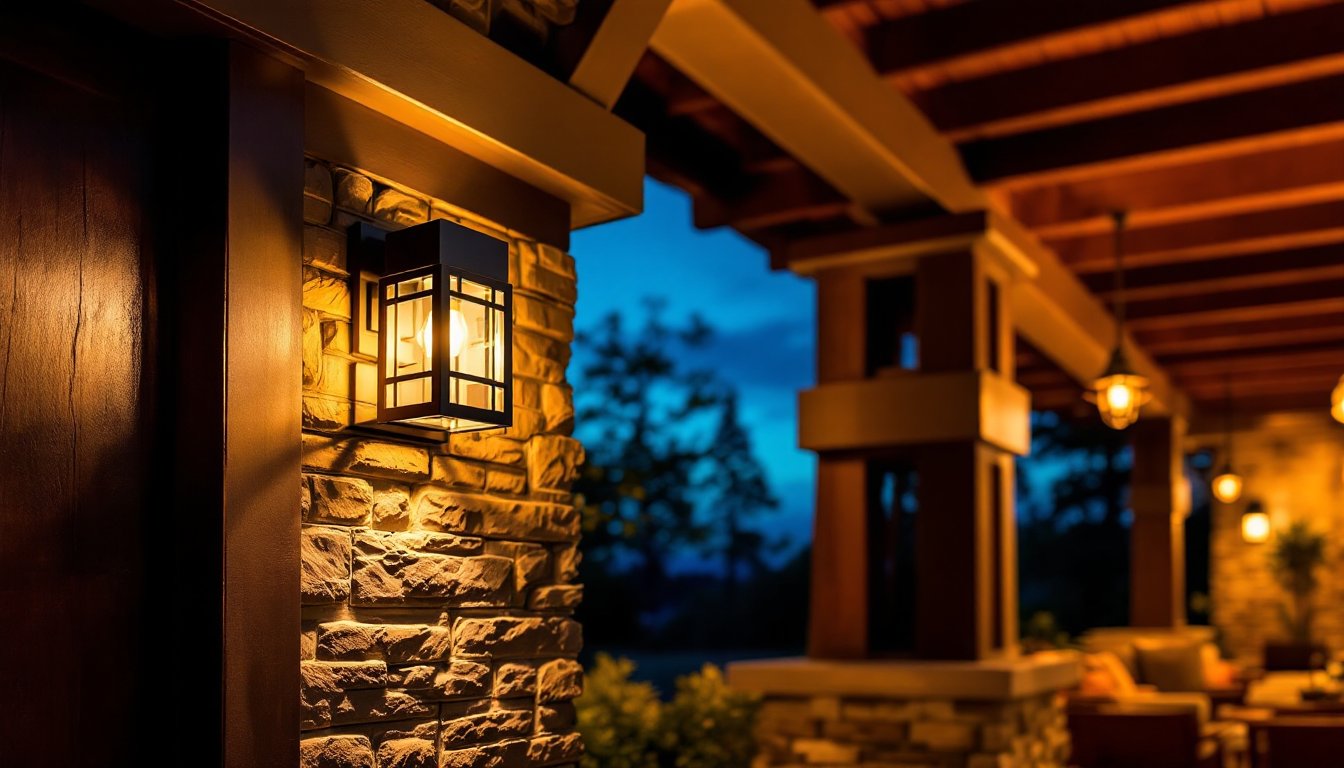
Craftsman design emerged in the early 1900s as a reaction against mass production. The style emphasizes handcrafted details, natural materials, and the beauty of structure itself, no unnecessary ornamentation. When applied to outdoor lighting, this means fixtures with visible joinery, glass panels that show the bulb (or warmly glow around it), and metal finishes like oil-rubbed bronze or copper that develop patina over time.
Look for lights with clean lines, geometric shapes, and minimal fuss. A classic craftsman wall sconce might feature a square or rectangular shade with exposed frame details and a visible socket. The bulb isn’t hidden behind fabric or plastic: it’s part of the design. Post lights often sit atop substantial bases with tapered or fluted columns, and pendant fixtures hang from simple chains or rods without excessive Victorian flourish.
The color palette matters too. Warm light temperatures (2700K–3000K) mimic the glow of early electric fixtures and feel inviting rather than cold. This differs sharply from contemporary minimalism or farmhouse style, which often favor either stark simplicity or shiplap-and-shutter rusticity. Exterior home lighting can take many forms, but craftsman design respects proportions and materials above all.
When planning your scheme, think about how fixtures relate to your home’s architectural details. A brick chimney, column-supported porch, or stone entryway becomes more dramatic when properly lit. Craftsman homes often feature these elements intentionally, so your lighting should frame them rather than compete with them.
Essential Lighting Fixtures for Your Craftsman Exterior
Wall Sconces, Post Lights, and Pendant Options
Wall sconces are the workhorse of craftsman exteriors. Mount them on either side of an entryway, along a porch, or flanking a garage door. Choose fixtures 12–16 inches tall and 6–8 inches wide for standard doors: scale up slightly for larger entries. Look for sconces with clear or frosted glass panels held in metal frames, and check that the fixture accepts at least a 60-watt equivalent LED bulb (about 800 lumens) for adequate task lighting near the door.
Post lights (also called post-top or pier lights) sit atop fence posts or deck railings, typically 12–24 inches above the surface. They cast light downward and around, making them ideal for pathway definition and ambient illumination. Standard post-top lights measure 12–18 inches tall and fit 4×4 nominal (actually 3.5×3.5 inch) posts via a threaded collar. Ensure the fixture is rated for outdoor wet or damp locations (check the UL label).
Pendant fixtures hang from porch ceilings or pergola beams using chains or rigid rods. In craftsman style, these typically measure 8–14 inches in diameter and feature geometric glass or metal shades. They work beautifully over seating areas or kitchen pass-throughs and need secure mounting to a structural framing member, never hang from drywall alone.
For a cohesive look, match finishes across fixtures (all oil-rubbed bronze, for example) and coordinate bulb color temperature. Home Depot Lighting Fixtures and specialty retailers stock extensive craftsman lines: cross-reference specifications with your existing home details before purchasing. Always confirm the fixture’s voltage, wattage capacity, and damp/wet rating.
Planning Your Outdoor Lighting Layout
Start by mapping your home’s exterior on paper or using a smartphone photo. Mark entry points (front door, garage, patio), pathways, architectural features (pillars, stone walls), and problem areas (dark corners, uneven steps). A well-lit exterior balances task lighting (safe foot traffic and door visibility) with ambient lighting (overall yard ambiance) and accent lighting (highlighting features).
Task lighting near doors and entries should provide at least 50 footcandles (roughly 500 lumens for a single fixture). Space wall sconces 6–8 feet apart along walkways, or use one sconce on each side of a standard door. For steps and ramps, position fixtures low (waist height) so light rakes across treads without creating shadows.
Ambient lighting sets the mood and covers larger areas. Post lights spaced 8–12 feet apart along a driveway or deck perimeter work well: pendants over a patio can create an outdoor “room.” Lay out fixtures on your map and note circuits and wiring runs.
Avoid common mistakes: Overlighting (too many fixtures create glare and wash out detail) and uneven spacing (which highlights gaps). Step back and ask whether each light serves a purpose, function before aesthetics.
Before breaking ground, check your local building codes. Many jurisdictions require permits for exterior electrical work, even hardwired low-voltage systems. Call your permit office or check online. If your home doesn’t have outdoor circuits, a licensed electrician can install a new 20-amp circuit from your main panel with weatherproof boxes and GFCI protection. This work isn’t a casual DIY project: electrical codes (NEC Article 406 covers outdoor receptacles and fixtures) exist to prevent fires and shock hazards. Outdoor Home Lighting requires careful planning and often professional installation.
Installation and Maintenance Tips for Long-Lasting Results
Once you’ve planned your layout and obtained permits (if required), installation depends on your fixture type and power source.
Hardwired fixtures require running electrical wire from a circuit breaker to each light. This typically demands a licensed electrician in most areas. Wire should be buried 18 inches deep in conduit or UF (underground feeder) cable, or run inside a wall during new construction. All exterior receptacles and switch boxes must be rated for wet locations and fitted with in-use covers (plastic flaps that keep rain out even with a plug inserted). Fixtures themselves must have damp or wet ratings matching your climate.
Low-voltage (12-volt) systems using a transformer offer a DIY-friendlier alternative for accent and ambient lighting. These kits include a transformer (plugged into an exterior outlet), low-voltage wire, and spike lights or other fixtures. They’re safer to handle and don’t require a permit in most places, but check locally. Run wire along the ground or under mulch, keeping it 6 inches below the surface if you’ll be digging. Watch for kinks and UV degradation: use conduit in sunny areas.
Mounting steps:
- Turn off power at the breaker for hardwired fixtures.
- Carefully remove the old fixture (if replacing) and disconnect wires.
- Install the new mounting bracket, ensuring it’s fastened to solid framing (not just drywall or siding).
- For wall sconces, find studs behind siding or use heavy-duty anchors: for post lights, ensure the post is securely set in concrete (minimum 24 inches deep, 4 inches diameter hole).
- Connect wires using wire nuts rated for outdoor use (silicone-filled), wrap connections in electrical tape, and tuck them into the fixture’s junction box.
- Restore power and test before finalizing the trim.
Maintenance keeps your fixtures looking and performing well:
- Clean glass and metal quarterly with a soft cloth and mild soap.
- Replace bulbs when they dim: LED bulbs last 15,000–25,000 hours, so plan for 7–10 years of service.
- Check for loose fasteners and weathered sealant annually: re-caulk gaps between fixtures and siding to prevent water intrusion.
- In coastal or high-salt environments, rinse fixtures with fresh water to slow oxidation of bronze or copper finishes (or embrace the patina, it’s part of the craftsman aesthetic).
Dusk to Dawn Outdoor Lighting systems add convenience with motion sensors or photocells, so lights activate automatically. These fixtures integrate seamlessly into craftsman designs when chosen carefully. Research shows that smart outdoor lights with motion detection reduce energy use while maintaining security. Battery-backed options exist, but hardwired fixtures remain the most reliable long-term solution.
Conclusion
Craftsman outdoor lighting transforms your home’s curb appeal and function with fixtures rooted in honest design and durable materials. By understanding design principles, selecting appropriate fixtures, planning layouts thoughtfully, and installing (or hiring a professional to install) with attention to electrical codes, you’ll create an exterior that welcomes visitors and showcases your home beautifully after dark. The investment in quality fixtures and careful planning pays dividends in both appearance and safety for years to come.


