In-ground lighting is one of those game-changing upgrades that most homeowners overlook until they experience it. Unlike surface-mounted fixtures that sit above the landscape, in-ground lighting fixtures install flush with or slightly recessed into the soil, deck, or walkway to deliver upward or outward illumination. This approach transforms pathways into safe, inviting passages while subtly highlighting trees, architectural features, and garden beds after dark. The result? A yard that’s both functional and visually stunning without harsh shadows or cluttered lighting equipment overhead. Whether you’re securing a driveway, creating ambiance, or adding depth to your landscaping, in-ground lighting delivers professional-looking results that most DIYers can install in a weekend.
Table of Contents
ToggleKey Takeaways
- In-ground lighting improves yard safety and aesthetics by creating clearly visible walkways while remaining nearly invisible during the day, unlike surface-mounted fixtures that clutter sightlines.
- LED and solar-powered options dominate modern in-ground lighting; LEDs consume 75-80% less energy than traditional bulbs and last 25,000+ hours, while solar lights offer zero-wiring installation at the cost of reduced brightness.
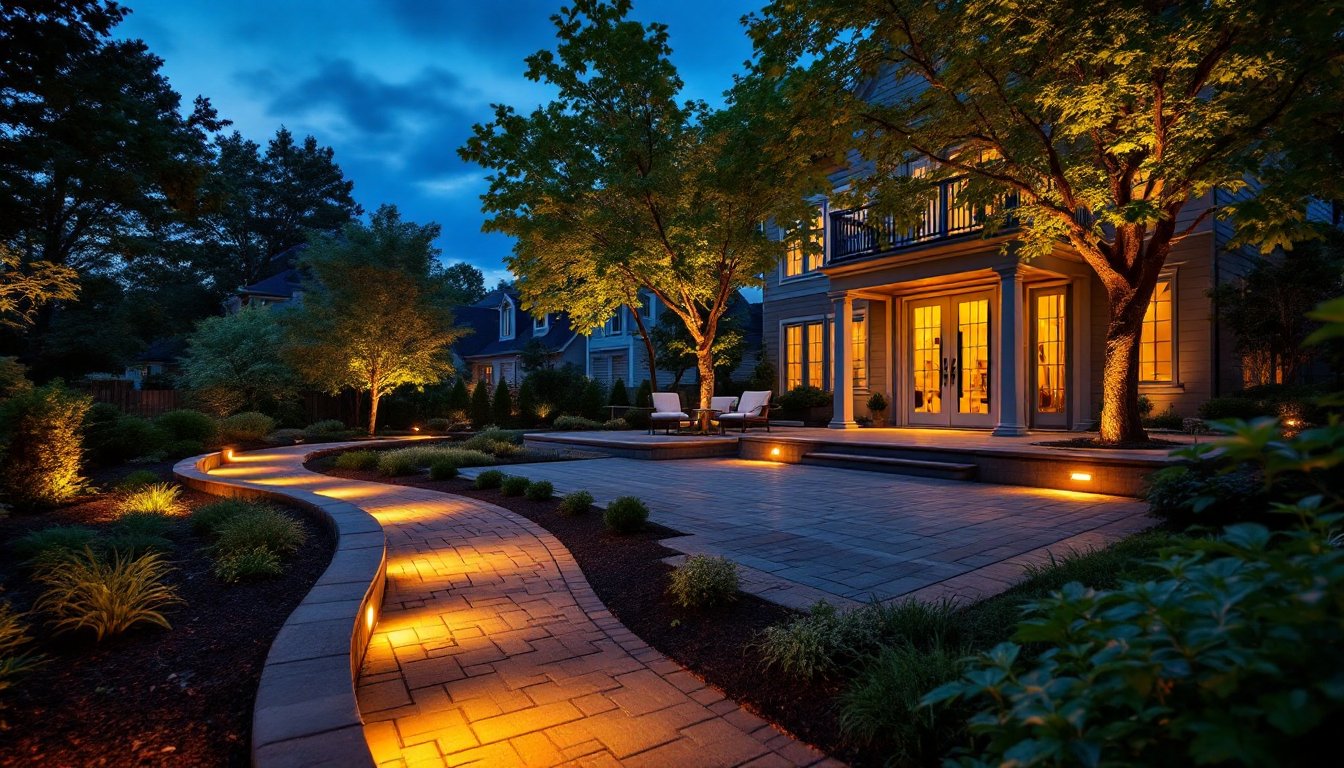
- Proper spacing and planning are critical—use the 8-10 feet rule for pathway lights and position uplights 4-6 feet from trees at 30-45 degree angles to avoid harsh shadows and create professional-looking illumination.
- Most DIY installations require trenching for electrical runs, fixture installation, and transformer connections; calling 811 for utility locates and using weatherproof connectors ensures safety and prevents costly damage.
- Seasonal maintenance—checking for water pooling, debris in fixtures, and cable damage—keeps in-ground lighting systems operating reliably for years with minimal effort.
What Is In-Ground Lighting And Why Your Yard Needs It
In-ground lighting includes well lights, deck lights, path lights, and uplights that sit at or below ground level to cast beams upward or laterally across your landscape. Unlike landscape spotlights on stakes or wall-mounted fixtures, these are permanent installations that blend seamlessly into your yard’s structure.
The core benefit is safety and functionality. In-ground path lights create clearly visible walkways, reducing trip hazards and eliminating the need for flashlights on evening strolls. They’re also softer on the eyes than overhead lighting, a beam rising from ground level feels less harsh than light dropping from above. Aesthetically, uplighting architectural elements like trees, fences, or home facades creates depth and visual interest that transforms a flat nighttime yard into a layered, curated outdoor room.
Where surface-mounted lights often look utilitarian, in-ground fixtures are nearly invisible during the day. They don’t clutter sightlines or compete with your landscaping’s daytime appearance. This is why landscape architects favor them for high-end residential projects. Installation does require digging trenches (for electrical runs) and drilling into hardscape, so it’s more involved than hanging a fixture on a wall. But, the payoff in curb appeal and functionality justifies the effort for most DIYers willing to plan ahead.
Types Of In-Ground Lighting Fixtures For Every Outdoor Space
LED And Solar-Powered Options
Most modern in-ground lighting relies on LED (light-emitting diode) technology, which consumes 75–80% less energy than traditional incandescent or halogen bulbs and lasts 25,000+ hours. LEDs stay cool, reducing heat buildup in enclosed fixtures and extending their lifespan in outdoor environments.
Solar-powered in-ground lights are the easiest entry point for DIYers because they require zero electrical wiring. A solar panel sits atop the fixture: internal rechargeable batteries store daytime sun energy and power the LED at night. They’re ideal for pathway accent lighting or remote areas away from electrical outlets. The trade-off: they’re dimmer than hardwired fixtures and perform poorly in heavily shaded or cloudy climates. Expect 8–12 hours of runtime on a full charge in sunny conditions: overcast regions may see only 4–6 hours.
Hardwired LED fixtures offer brighter output (typically 100–500+ lumens, depending on fixture size) and consistent nightly performance regardless of weather. They connect to a low-voltage transformer (12V or 24V is standard for landscape lighting) that steps down household current to safer, low-voltage DC power. This requires running electrical conduit to your circuit breaker or a dedicated outdoor outlet, but the brightness and reliability justify the setup for primary pathways or uplighting focal points.
Fixture types include well lights (designed to sit flush in soil and cast upward), deck lights (installed into deck boards or step edges), path lights (small bollards that mark walkways), and uplights (angled fixtures that graze trees or walls). Each serves a different purpose: combining types creates layered, professional-looking illumination.
Most commercial-grade fixtures are rated IP65–IP67 (submersible or fully waterproof), so occasional standing water or heavy rain won’t damage them. Check the specification sheet before purchasing: a fixture rated IP54 (splash-resistant but not waterproof) may fail if drainage is poor.
Planning Your In-Ground Lighting Layout
Calculating Coverage And Spacing
Before digging a single hole, sketch your yard to scale on graph paper or use a mobile app like iGarden or Landscape Design. Mark foot traffic zones, focal points (trees, water features, architectural details), and problem areas (dark stairs, shadowy corners). This prevents overbuying fixtures and ensures even coverage.
Path lighting spacing typically follows the rule of 8–10 feet apart. At this distance, overlapping pools of light create a continuous, safe passage without creating a “runway” effect. If spacing feels too wide when you visualize it, reduce to 6 feet: if it’s overkill for a narrow pathway, 12 feet works. Test the layout by setting marking flags or buckets at planned intervals and walk it at dusk to sense-check the spacing before committing to trenches.
Uplighting requires angle and distance calculations. To graze-light a 20-foot tree, position uplights 4–6 feet from its base at a shallow 30–45 degree angle: this prevents harsh “flashlight in the face” shadows and creates soft, dramatic silhouettes. For wall uplighting, stay 2–3 feet out to prevent spill onto the ground and adjacent landscape. Brightness (measured in lumens) also factors in: a 15-watt LED uplighter (200–300 lumens) suits accent lighting: a 30–50 watt fixture (600–1000 lumens) works better for larger trees or architectural emphasis.
Budget for flexibility. A typical residential landscape uses 8–15 in-ground fixtures depending on yard size and ambition. A solar path light costs $15–40: hardwired LED well lights or uplights range $60–200 each. Low-voltage transformers run $100–300. Professional installation adds $500–1500 in labor: DIY saves that cost but demands careful planning, trenching, and electrical knowledge.
Installation Guide For DIY Homeowners
Safety first: If trenching near underground utilities (gas, electric, water), call 811 in the US for a free locate service. Mark lines with spray paint before digging. Wear work gloves, safety glasses, and steel-toed boots when operating a trencher or shovel. For electrical connections, ensure you’re comfortable working with low-voltage wiring: if not, hire a licensed electrician for the transformer hookup.
Materials and tools you’ll need:
- In-ground light fixtures (quantity based on your layout)
- Low-voltage transformer (12V or 24V, sized for total wattage of all fixtures)
- Low-voltage outdoor cable (12 or 14 AWG rated for direct burial)
- Conduit or cable covers for surface runs
- Shovel or walk-behind trencher
- Level, measuring tape, marking flags
- Screwdrivers, wire strippers, weatherproof wire connectors
- Mulch or landscape fabric for backfill
Installation steps:
-
Mark the layout. Use your sketch as a guide: set flags at each fixture location and step back to verify spacing and sight lines. Adjust if needed before breaking ground.
-
Trench for hardwired cables (if applicable). Dig shallow trenches 6–12 inches deep, running from your power source toward each fixture location. A walk-behind trencher rents for $50–100 per day and saves back strain: hand digging works fine for short runs. Lay conduit or cable in the trench to protect it from accidental cuts.
-
Install fixtures in soil. Dig a hole slightly larger than the fixture’s base. Most well lights and uplights have a ground stake or mounting foot: insert it into the hole and backfill around it with soil, packing gently to secure it level. Use a level to confirm the fixture isn’t tilted.
-
For deck or hardscape lights: Drill a hole slightly larger than the fixture body (check manufacturer specs, usually 2–3 inches diameter). Insert the fixture, secure the mounting ring or gasket underneath, and tighten any provided hardware. Test-fit first in scrap wood to confirm fit.
-
Run and connect electrical cables. Strip the outer jacket from low-voltage cable, separate the conductors, and connect them to the fixture’s terminal screws using a screwdriver. Solar lights have no connections: hardwired fixtures must daisy-chain to the transformer. Use weatherproof wire connectors (not ordinary wire nuts) for any above-ground splices.
-
Connect transformer to power. The transformer plugs into a standard outdoor outlet (GFCI-protected) or hardwires to a dedicated circuit breaker. Most low-voltage transformers have terminal blocks for incoming household power and outgoing low-voltage outputs. This step should be performed by a licensed electrician if you’re uncomfortable with 120V wiring.
-
Test and bury cables. Before backfilling, power on the system and confirm all fixtures illuminate. Then cover trenches with mulch, soil, or landscape fabric. Avoid compacting heavily: a light backfill allows drainage.
-
Adjust aiming and angles. Once installed, walk the yard after dark and tweak uplighter angles or reposition fixtures if light falls where you don’t want it. Most fixtures have adjustable mounting feet or swivel heads.
Maintenance And Troubleshooting Tips
In-ground lighting is low-maintenance, but a few seasonal checks keep fixtures operating reliably. Check for debris and standing water after heavy rain or storms. Well lights can accumulate leaves or sediment: use a small brush or cloth to clear the lens. If water pools around a fixture, dig a small drainage channel or add gravel to improve drainage, prolonged submersion can eventually corrode seals.
For hardwired systems, inspect cable runs twice yearly for exposed sections, rodent damage, or cuts from lawn equipment. If you notice a fixture isn’t lighting, check that the low-voltage transformer is plugged in (outlets trip sometimes) and verify no loose wire connections at the fixture or transformer terminals. A simple multimeter test across the transformer output terminals confirms power delivery.
Solar fixtures need regular cleaning. Dust and pollen reduce solar panel efficiency: wipe the panel with a damp cloth every few months. If a solar light dims significantly or stops charging, the internal battery may be failing (typical lifespan is 2–3 years). Replacement batteries or full fixture swaps are inexpensive and straightforward.
Seasonal considerations: In cold climates, ensure transformers are rated for outdoor installation: some must be mounted in a weatherproof box or garage outlet to prevent frost damage. If you winterize your landscape, drain any water from conduit runs to prevent freeze-thaw cracking. Most LED fixtures tolerate freezing temperatures, but always check the manufacturer’s operating range.
Common issues and fixes:
- Uneven brightness across multiple fixtures: Low-voltage voltage drop occurs over long cable runs. If the last fixture in a daisy-chain is noticeably dimmer, loop cable back to the transformer in two separate runs rather than one long series.
- Fixture leaking water: Silicone sealant or an updated gasket kit (most manufacturers offer parts kits) can restore the seal. If degradation is severe, replacement is usually warranted.
- Overgrown vegetation blocking light: Trim shrubs and grasses back from uplights and path lights annually. This prevents shading and keeps beams visible.
<h2 id="” data-id=””>


