When landscape lighting stops working, your outdoor space loses its magic, and your home’s curb appeal takes a hit. The good news? Most landscape lighting repairs are straightforward enough for a handy homeowner to tackle. Whether your fixtures are flickering, dimming, or dead, the problem usually comes down to a handful of common culprits: corroded connections, burned-out bulbs, faulty transformers, or damaged wiring. You don’t need a licensed electrician for every issue, but knowing when to call one matters. This guide walks you through diagnosing problems, gathering tools, and handling repairs safely so your outdoor ambiance shines as intended.
Table of Contents
ToggleKey Takeaways
- Landscape lighting repairs often stem from corroded connections, burned-out bulbs, faulty transformers, or damaged wiring—most of which handy homeowners can diagnose and fix with basic tools.
- Flickering or dimming fixtures usually indicate loose connections or voltage drop; cleaning corroded connectors at the fixture base solves approximately 60% of single-fixture issues.
- A multimeter ($15–20) is essential for testing voltage and pinpointing whether the problem is a dead transformer, severed cable, or failed fixture connection.
- Landscape lighting bulb replacement is the quickest fix; always match the bulb type (G4, MR16, or LED) and never touch halogen bulbs with bare hands.
- Call a licensed electrician if the transformer is hardwired into your electrical panel, you discover damaged wiring with exposed copper, lights repeatedly trip a GFCI outlet, or multiple transformers fail in succession.
- Installing a GFCI-protected outlet for your transformer ensures safety when working outdoors and instantly shuts off power in case of a short circuit.
Common Landscape Lighting Problems and How to Identify Them
Before reaching for tools, pinpoint what’s actually broken. Landscape lighting systems typically include a transformer (usually low-voltage, 12V), underground or above-ground cable, and individual fixtures. Problems fall into predictable patterns, and identifying the right one saves time and frustration.
Flickering and Dimming Issues
Flickering lights drive you crazy, and usually signal loose connections or voltage drop. If a single fixture flickers or dims while others burn normally, that fixture likely has a corroded connector or a damaged socket. Moisture creeps into outdoor connections, creates resistance, and makes the light unstable. Check the base where the cable connects to the fixture: you’ll often see white, green, or black crusty buildup. That’s corrosion, and it stops current from flowing smoothly.
If multiple lights dim or flicker together, especially over a distance from the transformer, suspect a voltage drop along the cable run. Longer runs (50+ feet) draw so much power that fixtures at the end of the line get less juice. Low-voltage lighting systems are sensitive this way. A failing transformer can also cause dimming across the board, it might still power up but can’t maintain stable voltage as lights age or demand increases.
Complete Light Failures and Dead Fixtures
A fixture that won’t light at all could be a burned-out bulb, a severed cable, or a transformer that’s given up. Start with the simplest culprit: the bulb. Landscape lighting bulbs (often G4 halogen or LED) burn out after a few thousand hours. Replace it first, takes 30 seconds and costs five bucks.
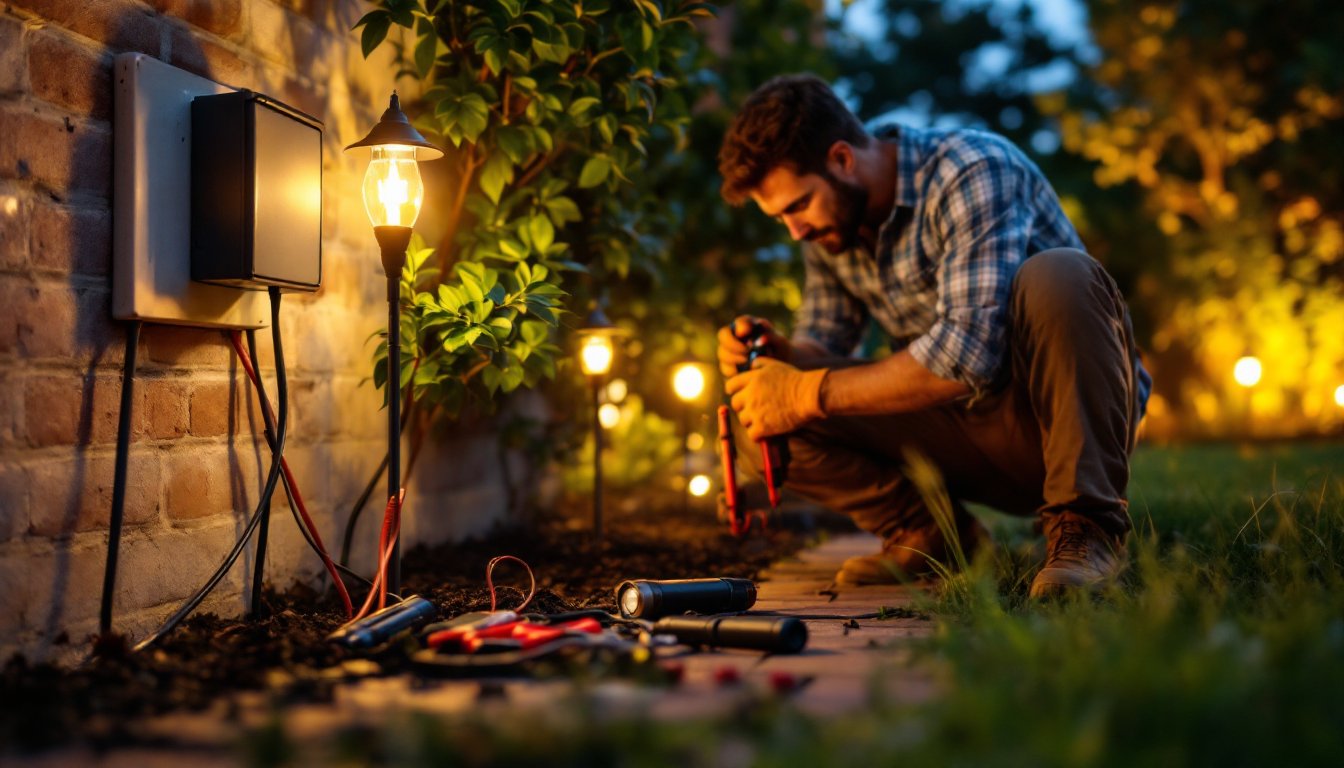
If the bulb’s fine, use a multimeter (a cheap $15 tester from any hardware store) to check for power at the fixture connection. No voltage? The cable might be cut, the transformer might be dead, or the fixture connection is so corroded it’s blocking all current. Buried cables get nicked during digging or landscape work. Winter freeze-thaw cycles also crack wiring over time. If the transformer itself isn’t powering on, check its power cord and outlet first, sometimes it’s just unplugged or the outlet’s tripped.
Essential Tools and Materials You’ll Need
You won’t need anything exotic, but having the right gear makes repairs faster and safer. Most of these cost less than a pizza.
Tools:
• Multimeter (digital volt/ohm meter), under $20: tells you where power is and isn’t
• Needle-nose pliers, for fiddling with small connections
• Screwdrivers (Phillips and flathead), for fixture and transformer terminal screws
• Wire strippers, to expose bare wire for connections, usually $10–15
• Small flashlight or headlamp, outdoor work often happens at dusk
• Socket wrench or hex key set, some fixtures use small bolts
• Utility knife, for cutting cable cleanly if splicing becomes necessary
• Electrical tape and wire nuts, if you’re replacing cable segments
Materials:
• Replacement bulbs (match your fixture type: G4, MR16, or whatever’s marked on the old bulb)
• Low-voltage wire connectors or twist-on terminals, pre-filled silicone gel ones ($2 each) resist moisture better
• New transformer (if needed), check your current one’s wattage rating and match it
• Replacement cable (if you’ve got a cut), 12-gauge or 14-gauge low-voltage, depending on your system
• Dielectric grease, smear this on connections to prevent corrosion
• Safety gear, work gloves (leather for cable work), safety glasses, and a headlamp
When working outdoors in wet conditions, make sure your transformer’s plugged into a GFCI-protected outlet (ground-fault circuit interrupter). These outlets shut off instantly if there’s a short, preventing electrocution. Most modern outdoor outlets have GFCI built in: if yours don’t, install one or use a GFCI extension cord.
Step-by-Step Repair Procedures for DIY Fixes
Most repairs follow a logical sequence. Start simple, then work your way up to more involved fixes.
Before you start: Turn off power at the transformer. Unplug it from the outlet. Even though landscape lighting runs on low voltage (usually safe to touch), you don’t want a surprise shock or a spark while you’re working with wet connections.
-
Clean corroded connections. If a single fixture flickers or dims, unscrew the connector at the fixture base. You’ll see the cable wires twisted together with the fixture’s internal wires. Use a small flathead screwdriver to scrape off corrosion, white, green, or black gunk. Wipe clean with a dry cloth. Twist the wires back together firmly, add a small dab of dielectric grease, and screw the connector back on. This fixes 60% of single-fixture issues.
-
Test for voltage. Still no light? Grab your multimeter. Set it to the DC voltage setting (usually marked with a V and a line or the direct-current symbol). Turn the transformer back on. Touch the multimeter probes to the cable wires near the dead fixture. You should see 12 volts (or whatever your system is rated for). No reading means power isn’t reaching that spot, the cable’s severed, or the transformer’s bad.
-
Inspect the cable run. Walk the cable path and look for cuts, pinches, or obvious damage. If you spot a severed section, you’ve got three options: (a) dig and splice the cable with waterproof connectors and wire nuts, (b) replace the entire run, or (c) call an electrician. Splicing works okay for temporary fixes, but a clean replacement is more reliable long-term.
-
Check the transformer. If the multimeter shows no voltage anywhere on the system, the transformer might be dead. Plug it in: does the power indicator light come on? If not, try a different outlet, the original outlet might be tripped or unplugged. If the transformer’s indicator light is on but you’re getting no voltage at the cable, the transformer’s internal circuitry has failed. These typically last 7–10 years outdoors: weather and electrical surges take their toll.
Replacing Bulbs and Transformers
Bulb replacement is the easiest fix. Most landscape fixtures use G4 halogen, MR16 halogen, or LED bulbs. They’re not interchangeable, check the old bulb’s label. Halogen bulbs run hot: never touch them with bare skin (your hand oils shorten their life). Use the bulb’s plastic wrapper or a lint-free cloth. LED replacements cost more upfront but last 25,000+ hours compared to halogen’s 2,000 hours, so they pay for themselves over time.
Transformer replacement is next-level but manageable. Your transformer sits near an outdoor outlet, usually in a weather-proof box. Unplug the old one. It’ll have two power wires going to the outlet (these stay connected: you just unplug) and a pair of output cables going to your landscape lights. Unscrew or unplug the output cables. Screw or plug the new transformer’s output cables to your existing cable. Plug the transformer into the same outlet. Turn it on and test a light. Make sure the new transformer’s wattage rating matches or exceeds your total fixture wattage. If you’ve got five 20-watt fixtures, you need at least a 100-watt transformer (always oversize by 20% for safety). You can usually find this info on a small label stuck to your old transformer or on the manufacturer’s website. LED lighting options are increasingly popular for landscape upgrades because they draw less power, letting you use smaller transformers. If your transformer’s mounting location has wires running to an older timer or control module, those can stay in place, just disconnect the output cables and reconnect them to the new transformer using the same terminals.
When to Call a Professional Electrician
Honest truth: some jobs belong to a pro. If you uncover any of the following, stop and call a licensed electrician.
Call a pro if:
• The transformer is wired directly into your home’s electrical panel (not plugged into an outlet). This requires a licensed electrician to touch, period. It’s part of your house’s main circuit, and messing with it is a code violation and a shock hazard.
• You find damaged wiring with exposed copper, cracked insulation, or burns. These don’t just need a patch: they signal deeper problems (a short, overload, or failed equipment upstream) that a pro must diagnose.
• Your lights keep tripping a GFCI outlet or blowing a breaker. This usually means a short circuit in the wiring or a failing fixture, and it’s dangerous to ignore.
• You’ve had multiple transformers fail in quick succession. This suggests a power-supply problem or a catastrophic short on your cable run. A professional can use a megohmmeter to test the entire cable for insulation breakdown, something a basic multimeter can’t do.
• Building permits are required for your project. Some jurisdictions require permits for any outdoor electrical work or for running new circuits. Check your local code before you start. If a permit’s needed and you do the work without one, your homeowner’s insurance might not cover related damage. Angi and HomeAdvisor both let you search licensed contractors in your area and read reviews.
A landscape lighting repair usually costs $150–$400 if a pro does it, depending on the problem and your region. It’s worth it if the issue is beyond basic bulb or connector work. Don’t let the fear of calling someone stop you from getting the job done right, especially if wiring or the transformer’s structural integrity is in doubt. Your safety and your home’s insurance coverage are worth more than pride on a DIY project.


