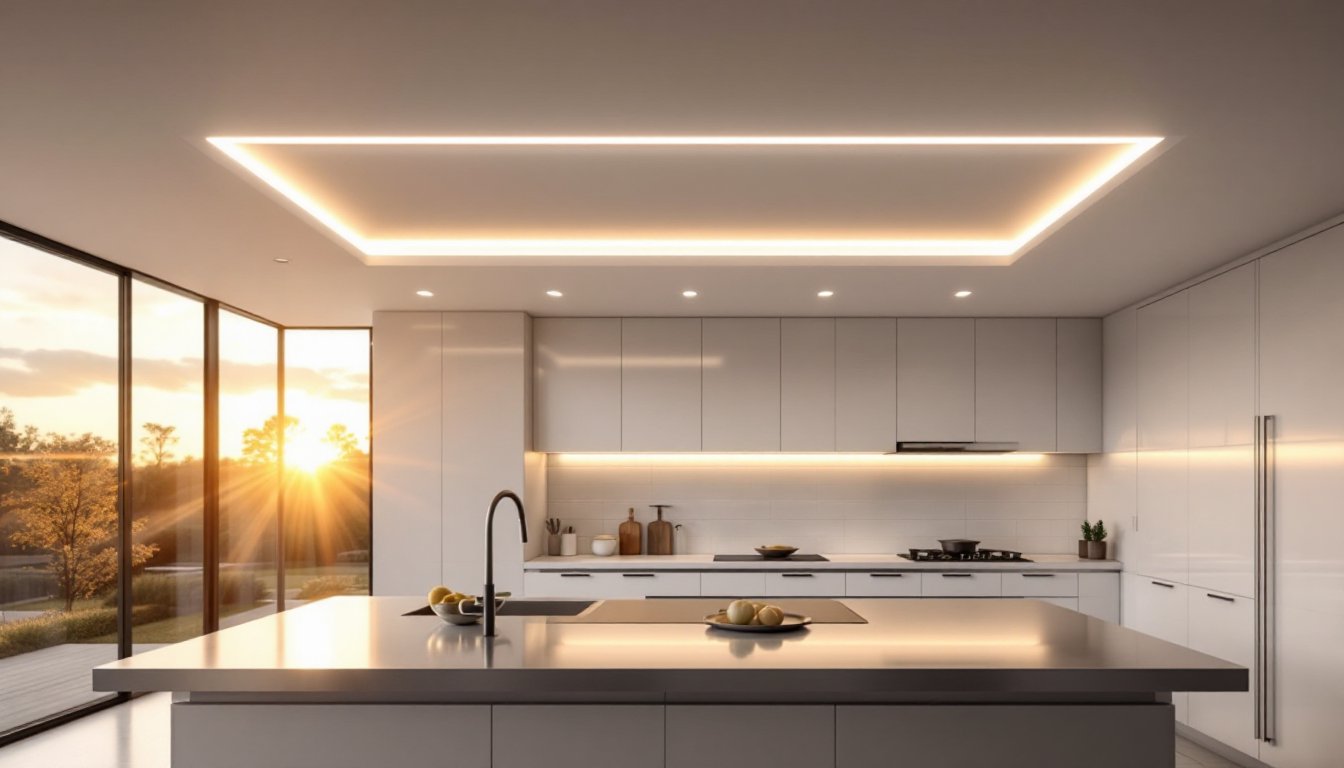
Linear recessed lighting has become a go-to choice for homeowners looking to modernize their spaces with clean, professional-looking illumination. Unlike traditional recessed lights that sit in circular housings, linear recessed fixtures use elongated channels or strips that blend seamlessly into ceilings and soffits. They deliver bright, even light without the visual clutter of protruding fixtures, ideal for contemporary kitchens, hallways, bathrooms, and living rooms. Whether you’re upgrading outdated lighting or building from scratch, understanding how linear recessed systems work and where they fit best will help you make smart decisions about your project.
Table of Contents
ToggleKey Takeaways
- Linear recessed lighting creates a sleek, uninterrupted ceiling line by mounting flush into ceilings with only a slim bezel visible, eliminating the visual clutter of traditional round recessed fixtures.
- LED linear recessed lights consume 10–15 watts per foot compared to 50+ watts for older halogen systems, delivering significant energy savings while supporting dimming and color temperature control from 2700K to 5000K.
- Kitchens and bathrooms are ideal spaces for linear recessed lighting installation, providing even task lighting above islands and vanities while requiring moisture-rated or IP65-rated fixtures in humid areas.
- Proper installation requires 3 inches of clearance around the housing to avoid joists, correct electrical gauge wire per NEC code, and a clean drywall cut using a template to ensure a professional finish.
- Select fixtures based on color temperature (warm white for cozy spaces, neutral white for task areas), lumen output matched to room size, and dimming compatibility rated at 10% or lower for optimal control.
- Budget $40–$120 per foot for standard linear recessed fixtures, plus $150–$300 per fixture for professional installation, with additional costs for dimming modules and custom trim options.
What Is Linear Recessed Lighting?
Linear recessed lighting consists of long, narrow fixtures mounted flush into ceilings or walls, typically ranging from 1 to 4 feet in length. The fixture body sits above the finished ceiling surface in the cavity between joists, while only a slim trim bezel remains visible below. The light source, almost always LED today, runs along the length of the channel, creating a continuous line of illumination rather than scattered pools from point sources.
These fixtures come in a few standard forms. Recessed linear channels are the most basic: essentially a housing with built-in or swappable LED tape and simple end caps. Trimmed linear recessed fixtures include finished bezels (aluminum, plastic, or decorative trim options) that frame the light line neatly. Lengths typically start at 12 inches and extend to 4 feet or longer, and you can usually link multiple units end-to-end for extended coverage.
Because they’re designed for 120V or 277V circuits and often feature dimming capabilities, linear recessed lights offer flexibility that simple ambient ceiling fixtures can’t match. The beam spread varies by lens type, some models spread light evenly across a wide area, while others focus it downward in a tighter pattern.
Key Advantages and Design Benefits
The appeal of linear recessed lighting comes down to aesthetics and performance. First, the low-profile design eliminates the visual bump of round recessed cans, creating a sleek, uninterrupted ceiling line that reads as intentional and upscale. Architects and high-end builders favor them because they feel architectural rather than utilitarian.
Energy efficiency is a major win. Modern LED linear fixtures consume 10–15 watts per foot compared to 50+ watts for older halogen or incandescent systems. Over time, especially in homes where lights stay on for hours daily, the savings add up. Many models also support dimming and color temperature control, letting you shift from 2700K (warm white) to 4000K (neutral) or even 5000K (cool white) without swapping bulbs.
Installation is often simpler than traditional recessed cans because you don’t need to cut individual holes for each fixture or install separate trim rings. A single rectangular opening and a linear housing do the work of three or four point lights. This also means fewer penetrations through insulation, important for air sealing and energy code compliance. Plus, linear fixtures work in spaces where round cans won’t fit, like narrow soffits, tight architectural niches, or above kitchen islands where ceiling depth is limited.
Where to Install Linear Recessed Lighting
Kitchens and Bathrooms
Kitchens are prime territory for linear recessed lighting. A single 3-foot or 4-foot fixture centered above an island or peninsula provides even task lighting without the harsh shadows that come from a single hanging pendant. Many builders now run linear lights along the perimeter of drop soffits or cove areas, creating ambient glow that also works as accent lighting above cabinets. Bathrooms benefit similarly, a linear fixture above a vanity delivers shadow-free, flattering light for grooming tasks, and dimming capability lets you dial brightness up for morning routines or down for evening wind-downs.
Both spaces require vapor-rated or IP65-rated fixtures if humidity is a concern. Kitchens near steaming cooktops and bathrooms with showers need sealed housings to prevent moisture infiltration. Check your local building code, some jurisdictions mandate specific moisture ratings in wet locations, so don’t assume a fixture marked “damp location” is enough.
Living Spaces and Hallways
In living rooms and bedrooms, linear recessed lights work as both ambient and accent lighting. Run them around a tray ceiling, cove, or architectural crown for indirect, diffused light that creates ambiance without glare. Hallways and corridors are ideal: a single 4-foot fixture centered overhead beats installing two round cans and uses the same circuit.
One note: in smaller rooms with standard 8-foot ceilings, oversized linear fixtures (longer than 3 feet) can feel cramped. Prioritize fixture length that’s proportional to the room. Recessed lighting placement guides offer detailed spacing rules if you’re planning multi-fixture layouts.
Installation Essentials for DIY Homeowners
Before you start cutting ceilings, confirm your framing. Most linear recessed fixtures need to clear joists and blocking in the cavity above, at least 3 inches of clearance around the housing is standard. Use a stud finder or drill a test hole to map joist locations. If your fixture falls directly under a joist, you’ll need to relocate the opening, notch the joist (only if it’s non-load-bearing and meets code), or choose a shorter fixture.
Rough-in work comes first. Mount the housing between joists using the factory brackets, securing them to the framing with 1¼-inch drywall or wood screws. Run electrical supply to the fixture, typically 14/2 or 12/2 NM cable for standard circuits, though some high-output fixtures may need heavier gauge wire. The National Electrical Code (NEC) requires that fixture wiring be protected from damage and properly rated for the circuit amperage. If you’re unsure about wiring, hire a licensed electrician: mixing up gauge or overcircuiting a fixture is a fire risk.
Once drywall is installed and taped, cut your opening. Use a drywall saw or reciprocating saw with a fine-tooth blade to make clean edges. Most linear fixtures provide a cardboard or plastic template to mark the exact cut location. Take time here, a ragged hole requires touch-up painting or trim adjustments.
Slip the fixture trim into the opening so the flange sits flush against the finished ceiling. Most linear fixtures have a snap-in or screw-down trim ring that secures the bezel. Wear safety glasses, metal edges are sharp, and drywall dust hangs in the air during this step.
Dimming and control vary by fixture type. Some use traditional wall-mounted dimmers rated for LED, while others rely on in-line modules or wireless controls. Check the fixture’s wattage and ensure your dimmer is compatible, not all dimmers work with all LEDs due to minimum load requirements. Understanding recessed lighting housing specifications helps you match fixtures to your circuit and control scheme.
Choosing the Right Fixtures and Finishes
Color temperature is the first call. Warm white (2700K) suits kitchens, bedrooms, and living areas where you want cozy ambiance. Neutral white (4000K) works better in bathrooms, task-heavy kitchens, and commercial-leaning spaces. Cool white (5000K) is rare in homes but shows up in garages or detailed craft spaces.
Bezel finish matters cosmetically and functionally. Matte black and matte white are the most forgiving, they hide dust and don’t show fingerprints. Polished chrome or brushed aluminum look sleek but require more frequent cleaning. Some fixtures offer interchangeable trim rings, letting you swap finishes down the line without replacing the whole unit.
Lumen output drives perceived brightness. A 1-foot fixture might output 500–800 lumens, while a 4-foot model delivers 2,000–3,000 lumens or more. Room size, ceiling height, and surrounding paint color all affect how bright it feels. A dark room needs more lumens: white walls and ceilings amplify existing light. Manufacturers publish photometric data, don’t guess based on wattage alone.
Dimming compatibility is non-negotiable if you want flexibility. Not all LEDs play well with all dimmers: some flicker, buzz, or won’t dim smoothly. Look for fixtures explicitly labeled “dimmable to 10%” or lower if you like dramatic lighting control. High-end models support 0–10V dimming, which offers the smoothest, most reliable fade.
Budget varies widely. Basic linear fixtures run $40–$120 per foot, while designer or high-end commercial-grade models exceed $200 per foot. Dimming modules, wireless controls, and custom trim add cost. Installation cost estimates include both materials and labor if you hire a pro, expect $150–$300 per fixture for a licensed electrician to rough-in and trim-out a new circuit, depending on your region and circuit complexity.
Safety gear is mandatory. Wear safety glasses during ceiling cutting, work gloves when handling metal trim and wiring, and a dust mask if you’re dealing with fiberglass insulation or old drywall dust. If you’re running new circuits, shut off power at the breaker and use a non-contact voltage detector to confirm lines are de-energized before touching them. Electrical work is nothing to wing, if you’re uncomfortable, call a pro. Professional resources like Family Handyman and This Old House offer detailed wiring tutorials if you want to upskill, but licensing rules vary by state and locality.


