Good outdoor wall lighting isn’t just about visibility after dark, it transforms your home’s facade, boosts security, and creates the kind of ambiance that makes your neighbors jealous. Whether you’re installing fixtures for the first time or upgrading what you’ve got, the variety of options available today means there’s something for every budget, architectural style, and technical skill level. This guide walks you through seven proven outdoor wall lighting designs, covering installation basics and real-world considerations so you can make informed choices before you buy.
Table of Contents
ToggleKey Takeaways
- Outdoor wall lighting ideas include seven proven designs—from dramatic uplights and classic lantern sconces to modern recessed lights and LED strips—each suited to different architectural styles and budgets.
- Uplights mounted 2–3 feet from the wall base and spaced 8–12 feet apart create dramatic accent lighting while increasing home value perception and security.
- Lantern sconces positioned 5–6 feet above grade near entry points provide both functional task lighting and welcoming curb appeal for traditional and transitional homes.
- Low-voltage LED step and pathway lights require no electrical permit in most areas and dramatically improve safety by illuminating tripping hazards without hardwiring complexity.
- All outdoor lighting installations must comply with GFCI protection per the National Electrical Code, and local permits should be verified before starting work.
- Smart outdoor wall lights offer remote control, dimming, and scheduling features, but should include a manual hardwired switch as a backup for critical safety lighting.
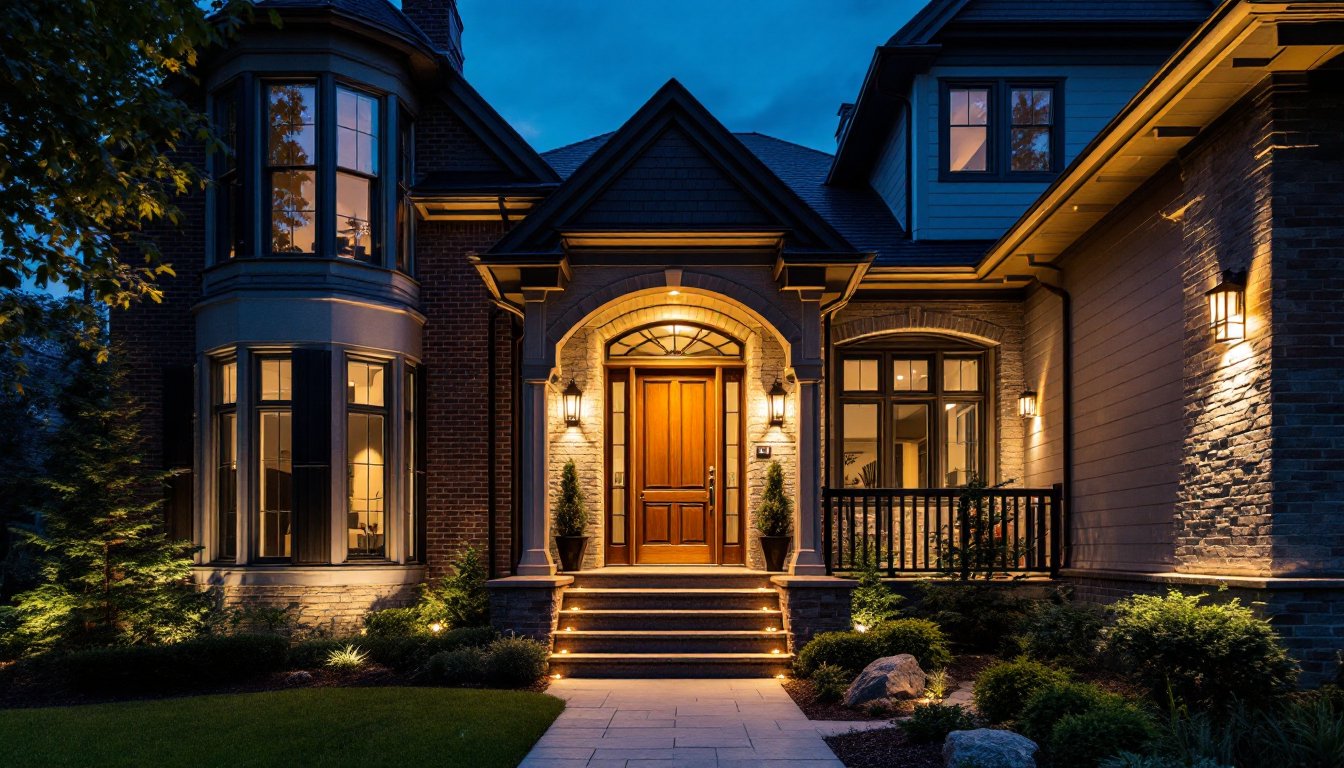
Wall-Mounted Uplights for Dramatic Accent Lighting
Uplights are the workhorse of dramatic outdoor wall illumination. Mounted low and angled upward, they cast light across the facade and emphasize architectural details like brick texture, siding, or stone features. This technique is called “grazing” and reveals depth and dimension that flat frontal lighting misses.
Installation requires a standard electrical outlet or a junction box on your foundation. Most uplights come as 12–18-watt LED units with a beam angle of 30–60 degrees. You’ll need to run 10–2 or 12–2 outdoor-rated cable from your breaker panel or existing circuit, though many DIYers opt for low-voltage uplights (12 volts) that plug into a transformer, eliminating the need for hardwiring and permits in most jurisdictions. When selecting uplights, verify the mounting surface can support the fixture weight and that the beam angle matches your wall height: a taller wall needs a narrower angle to prevent wasting light overhead.
Recent studies on exterior home lighting confirm that uplights increase home value perception and security. Place uplights 2–3 feet from the wall base and space them 8–12 feet apart for even coverage without harsh shadows.
Lantern Sconces for Classic Curb Appeal
Lantern sconces are the reliable choice for traditional and transitional homes. They mount directly to the wall beside doors and windows, providing functional task lighting while adding character. A well-placed sconce both looks intentional and performs the job of welcoming visitors and lighting entry points.
These fixtures typically accept 40–60-watt equivalent LED bulbs (real power draw: 6–8 watts) in standard E26 sockets. Installation is straightforward: turn off power at the breaker, cut a hole if needed for the mounting bracket, fasten the bracket to a wall stud or use heavy-duty anchors for non-stud locations, then wire the fixture using a standard 3-conductor cable and connect to an existing switch circuit. Most homes already have switched outdoor circuits near garage doors or patios, you can often branch into those rather than running new cable.
Vary sconce height and spacing based on your entry layout. Position them 5–6 feet above grade (door height), flanking the entrance symmetrically, or stagger them along a walkway at 8–10-foot intervals for safety and aesthetics. Outdoor home lighting design works best when fixtures are sized proportionally to the architectural features they’re beside.
Recessed Wall Lights for Modern Minimalism
Recessed wall lights sit flush with the wall surface, no protruding fixture body. They’re perfect for contemporary and minimalist exteriors where clean lines matter. The fixture carriage bolts into the wall cavity, and only the trim ring and light source are visible, creating a seamless appearance.
Before buying, confirm wall cavity depth. A typical recessed outdoor fixture needs 4–6 inches of framing depth, which most stud walls provide. You’ll need to cut a 4-inch round or rectangular hole using a drywall saw or hole saw. If you’re retrofitting into existing stucco or masonry, hire a masonry contractor, drilling clean holes in these materials is time-consuming and risks cracking.
Recessed fixtures commonly use 15–20-watt LED trim modules that slide into the carriage. Wire the carriage to your switch circuit before pushing it into the wall cavity. Once the light is in place, use the provided trim ring to seal the gap and finish the wall. Spacing matters: place recessed lights 6–8 feet apart along a wall to avoid dark patches, and avoid placing them where rain runoff from soffit vents could pool.
Step and Pathway Lights for Safety and Style
Step and pathway lights serve a dual purpose: they light up potential tripping hazards while adding subtle ambiance. Low-voltage LED step lights are the safest and easiest to install, and they require no electrical permit in most areas.
A typical low-voltage pathway light system includes a solar panel, a 12-volt transformer, low-voltage cable, and individual step-mounted fixtures. The transformer accepts 120-volt house current (plug into a GFCI outlet if possible) and steps it down to 12 volts at a much safer amperage. Run the low-voltage cable in conduit if it crosses high-traffic areas: otherwise, it can lie on the surface and is easily stepped on without risk. Each light fixture has a simple push terminal connection, no crimping or soldering required for basic installations.
For stairways, install step lights 1–2 feet apart near the inside edge of the step, about 2–3 inches above the tread surface. This height prevents stubbing toes while illuminating the step edge. Pathway lights work best spaced 4–6 feet apart along a walkway. If you’re lighting a long driveway, consider a dusk to dawn outdoor lighting system that runs on a timer or photocell for convenience.
LED Strip Lighting for Contemporary Ambiance
LED strip lighting, adhesive-backed, flexible ribbon with integrated LEDs, is the go-to for modern architectural accents and ambient outdoor lighting. It looks sleek running along soffit edges, fence lines, arbors, or under deck railings. Unlike traditional fixtures, strips blend into the structure rather than standing out as objects.
Outdoor-rated LED strips come in warm white (2700K–3000K), neutral white (4000K–5000K), or color-changing RGB varieties. Look for strips rated IP65 or higher (water-resistant with potted ends) and UL listed for outdoor use. Adhesive backing works on clean, dry surfaces like painted wood or PVC: on rough surfaces, use stainless steel mounting clips. Power requirements range from 2–5 watts per meter depending on brightness, so verify your power supply before installation.
Run power to a waterproof junction box or transformer mounted nearby. For shorter runs (under 16 feet), plug directly into a GFCI outlet. For longer runs, you may need a larger 24V or 12V supply, check the strip specifications. Seal all cable connections with waterproof silicone. Space the strip close to the surface it’s illuminating, 1–2 inches for best definition and minimal light scatter. Modern lighting design benefits from careful cable routing to hide power connections and emphasize the light effect itself.
Smart Outdoor Wall Lights With Remote Control
Smart outdoor lights let you control brightness, color, and scheduling from your phone or voice assistant. These fixtures use Wi-Fi or Bluetooth to connect to a hub or directly to your home network, offering convenience and energy savings through automated scheduling.
Wiring a smart fixture is identical to a standard hardwired light: turn off power, run outdoor cable to a junction box, and connect the fixture’s terminal block to your circuit. The difference is in the fixture itself, it contains a small circuit board and wireless receiver. Most smart outdoor wall lights support dimming to 10% (great for nighttime security without glare) and scheduling (on at dusk, off at midnight, for example). Some are color-tunable (adjustable white temperature) or full RGB (any color), though RGB lights are better suited to accent use than primary lighting.
Be prepared for setup: download the manufacturer’s app, create an account, connect the light to your Wi-Fi, and assign it to a zone (front porch, driveway, etc.). Reliability depends on your Wi-Fi signal strength at the fixture location, if the light is too far from your router, it may disconnect during operation. For critical safety lighting, pair a smart fixture with a traditional hardwired switch as a manual override.
Installation Tips and Best Practices
Before you buy anything, map out your electrical plan. Outdoor circuits should be protected by a GFCI breaker or outlet per the National Electrical Code (NEC Article 210.8). Any outlet within 6 feet of water must be GFCI-protected, this includes near downspouts, sprinkler heads, or wet areas. Check local codes: some jurisdictions require permits for any hardwired outdoor lighting, while others exempt low-voltage systems under a certain wattage.
Safety first: Always turn off the breaker and verify the circuit is dead with a non-contact voltage tester before working on wiring. Wear eye protection when cutting into walls or stucco, and use work gloves when handling rough materials. Use proper cable rated for outdoor use (typically USE-2 or NM-B with jacket UF), and bury any exterior cable 12 inches deep or in conduit if it’s exposed or where foot traffic is heavy.
Prep work is critical. On stucco or masonry, use an impact drill and carbide bits, standard bits will wander. For wooden surfaces, prime and caulk all holes after installation to prevent water infiltration. Test every fixture before final sealing: if a light doesn’t come on, isolate the issue (dead bulb, loose connection, blown breaker) before you call it finished.
Consider home lighting fixtures from reputable suppliers that offer returns. Outdoor fixtures face weather extremes, and a low-cost knockoff that fails in two seasons costs more than a durable option over the long run.


