Composite decking has become the go-to material for homeowners wanting low-maintenance outdoor living, but the real transformation happens when you add proper lighting. Composite deck lighting doesn’t just make your space usable after sunset, it enhances safety, extends entertaining seasons, and dramatically changes how your yard feels. Whether you’re securing a nighttime pathway, creating ambiance for gatherings, or simply illuminating your deck for functional visibility, the right lighting approach turns a deck into an outdoor room. This guide walks you through the key options, planning considerations, and straightforward installation steps to light your composite deck like a pro.
Table of Contents
ToggleKey Takeaways
- Composite deck lighting enhances safety by preventing trips and falls while extending deck usability from dusk deep into evening, transforming it into a genuine outdoor room.
- LED post cap lights and rail lights are the easiest retrofit options for existing composite decks, with post caps typically producing 50–150 lumens and requiring no wiring for solar models.
- Proper planning involves mapping lighting zones by function—stair treads need at least 20 lumens per step, while seating areas can handle 100–200 lumens for comfortable socializing.
- Low-voltage wiring must be certified outdoor landscape wire buried 4–6 inches deep, with all connections sealed using weatherproof connectors to prevent moisture damage to your composite deck lighting system.
- Smart-enabled composite deck lighting fixtures allow you to control brightness and color temperature from your phone, with warm white LEDs (2700K) creating relaxing ambiance and cool white (5000K) offering better task visibility.
- Installation success relies on careful preparation, proper fixture spacing (post caps every 6–8 feet, rail lights every 2–3 feet), and testing all lights in daylight before sealing anything permanently.
Why Composite Deck Lighting Matters
Safety is the first reason to add deck lighting. A well-lit path prevents trips and falls, especially on composite surfaces that can feel slippery in low light even when they’re not. Beyond safety, lighting extends your deck’s usability from dusk deep into evening, turning it from a daytime-only amenity into a genuine outdoor room.
Composite decking itself doesn’t absorb heat the way wood does, making evening use more comfortable, and good lighting amplifies that advantage by letting you actually see what you’re doing. Whether you’re hosting a small dinner party or just reading with your morning coffee before the sun rises, thoughtful illumination makes the difference. Modern composite deck lighting also comes with smart home options, allowing you to control brightness and color temperature from your phone or voice assistant. Outdoor Home Lighting: Transform solutions range from simple post caps to integrated rail systems, all designed to work with composite materials without damaging them.
Types of Composite Deck Lighting Solutions
Understanding your lighting options helps you choose what fits your deck layout, budget, and aesthetic goals. Each type serves different purposes and installation complexity.
LED Post Cap Lights and Rail Lights
LED post cap lights mount directly on top of your 4×4 or 6×6 deck posts and are arguably the easiest retrofit for existing composite decks. These sealed units contain LEDs and a battery or hardwired power source. Most produce 50–150 lumens, enough for ambient lighting and low-level pathway visibility. Installation typically involves unscrewing a bolt on top of your post, sliding the cap on, and securing it, no wiring required for solar models. Look for post caps rated IP67 (dust and water resistant) to ensure longevity on a deck exposed to weather.
Rail lights attach to your deck railing and come in two main flavors: surface-mounted and recessed into the rail’s inner edge. Surface-mounted rail lights are the simplest to install: they clamp or bolt to existing composite railings. Recessed rail lights require cutting slots into your composite rail during the build phase or retrofitting by carefully routing channels into finished rails, this takes more precision but looks cleaner. Most rail lights use 1–2 watt LEDs and run on low-voltage power (12V or 24V) for safety. Popular Mechanics reviews highlight that LED efficiency means you can light a whole railing on a single 20-watt transformer.
Under-Deck and Recessed Lighting
Under-deck lighting mounts to the underside of deck joists and beams, illuminating the space below your deck, a valuable feature if you have a covered patio or living area underneath. These fixtures hang downward and typically use 5–20 watt LED modules. Installation involves securing weatherproof housings to joists with lag bolts or brackets, then running low-voltage wiring along the framing. This approach requires planning during deck construction or careful routing if retrofitting an existing deck.
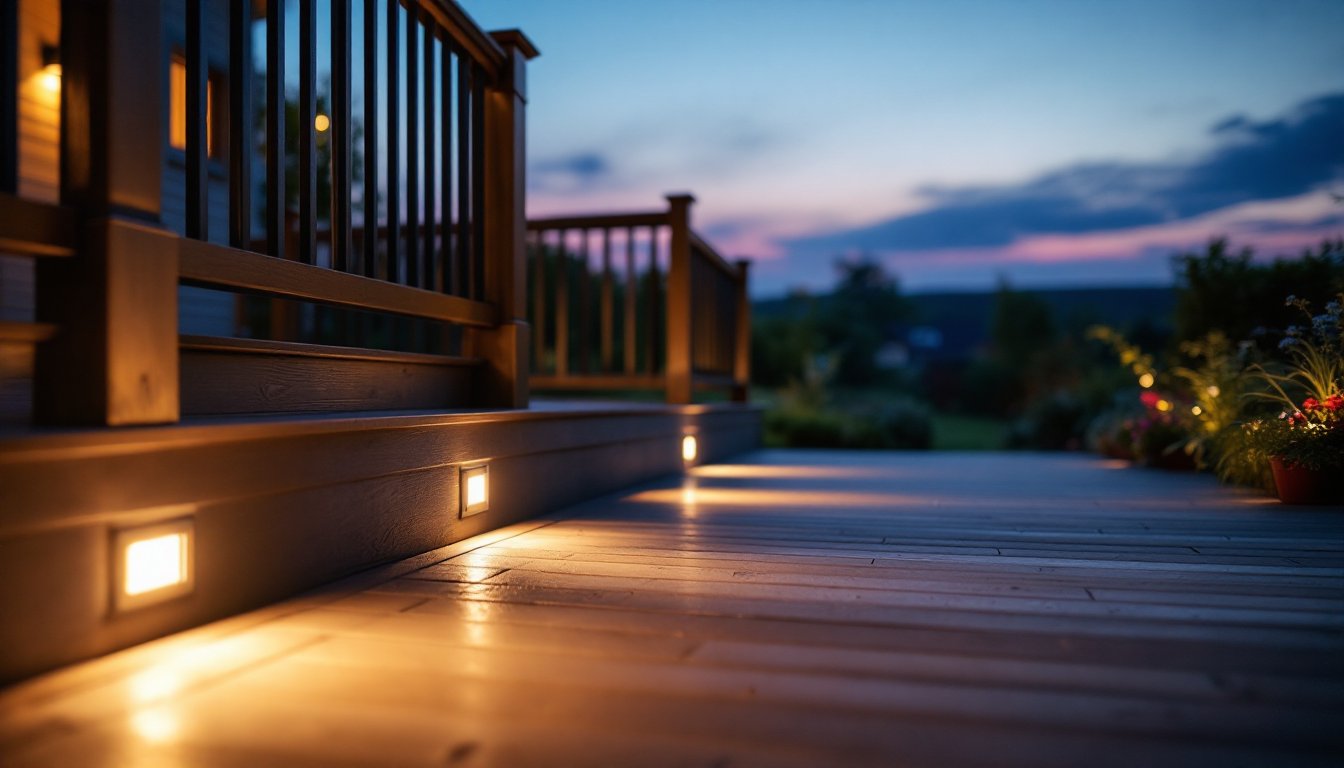
Recessed deck lighting sits flush within the deck surface itself, in stair treads, fascia boards, or decking planks. Composite materials are ideal for recessed lights because you can cut clean openings without splintering (unlike pressure-treated wood). Typical recessed fixtures are 2–4 inches in diameter and mount in pre-cut openings or drilled holes. They require low-voltage wiring run beneath the deck surface, plan this before installing decking boards. Recessed lights deliver a sophisticated, minimalist look and are safer than protruding fixtures since nothing catches a foot or shin.
Planning Your Deck Lighting Layout
Before you buy a single fixture, walk your deck at dusk and note problem areas. Where do you stub your toes? Where do you want to gather? What views do you want highlighted?
Map zones by function. Stair treads need visibility for safe footing: aim for at least 20 lumens per step. Edges and corners benefit from low-level accent lighting (10–30 lumens) to define the deck perimeter without harsh glare. Seating areas can handle higher lumen counts (100–200) for comfortable evening socializing. Pathway lighting generally sits 12–18 inches above the deck surface to avoid glare.
Consider spacing and wiring runs. Post cap lights work best spaced 6–8 feet apart for even illumination. Rail lights can be closer, every 2–3 feet, for a continuous line of light. If you’re running low-voltage wiring, plan your transformer location near a weatherproof outlet (typically GFCI-protected, as per NEC standards). Low-voltage cable can run along framing, under trim, or buried shallowly underground: keep runs under 100 feet to avoid voltage drop that dims distant lights.
Aesthetic and comfort matter. Warm white LEDs (2700K color temperature) create a relaxing, evening ambiance: cool white (5000K) feels more clinical but offers better visibility for tasks. Many Home Depot Outdoor Lighting products now offer tunable options that let you switch between warm and cool. Avoid overlighting, excessive brightness washes out your deck’s color and creates harsh shadows. A good rule: start with 25–50% more fixtures than you think you need, then trim back after a test run.
Smart controls simplify operation. WiFi-enabled post caps and rail lights let you dim, change color, or set schedules from your phone. Some integrate with existing smart home hubs (Alexa, Google Home, Apple) for voice control. This convenience costs more upfront but pays off if you’re entertaining regularly or want to adjust mood lighting without walking outside.
Installation Tips for DIY Success
Most composite deck lighting projects fall into the DIY-friendly category, provided you follow a few key principles.
Prep and planning prevent mistakes. Lay out all fixtures and wiring before installing anything. Use a torpedo level to ensure post caps and rail lights sit straight (even 2–3 degrees off looks crooked). For recessed lights, drill pilot holes with a spade bit or hole saw slightly smaller than the fixture housing: this prevents cracking composite material. Mark every wiring run with painter’s tape before routing cables, so you know exactly where power lines are if you ever need to modify the deck.
Low-voltage wiring is forgiving but must be done right. Use only certified low-voltage landscape wire (typically 10 or 12 gauge for under 100 feet) rated for outdoor burial. Never run low-voltage and standard 120V power in the same conduit. Connections should be sealed with weatherproof connectors (wire nuts with silicone gel inside are standard) or crimped connectors, then covered with electrical tape. Bury cables at least 4–6 inches deep if running them under mulch or soil, and use conduit if running them where foot traffic might occur.
Transformers and power sources need shelter. Wall-mounted or pedestal-mounted low-voltage transformers should be housed in a weatherproof NEMA 3R box mounted to your house, garage, or a post. Install a separate GFCI circuit breaker or outlet to protect the transformer circuit, as required by electrical code in most jurisdictions. If using solar post caps, position them to receive at least 6–8 hours of direct sunlight daily: shade from trees or nearby structures will drain batteries fast.
Safety gear and tools matter. Wear safety glasses when drilling into composite (small chips fly), work gloves when handling fixtures and wiring, and ear protection if using power tools for extended periods. A power drill with a 3/8-inch chuck, a torpedo level, a voltage tester (to confirm power is off before working on circuits), a wire stripper, and crimping pliers round out the essential toolkit. HomeAdvisor notes that rushing electrical work causes most DIY lighting failures.
Test before sealing anything. Power on your system in daylight and check that all fixtures light. Walk the deck at dusk and adjust positioning or lumen brightness. If a fixture is too bright or casts harsh shadows, dim it or redirect it. Most modern LED fixtures are dimmable: take advantage of this flexibility during your test phase.
Composite-specific considerations. Composite decking expands and contracts slightly with temperature and moisture. Avoid overtightening fasteners on rail lights or post caps: leave 1/8-inch play to prevent cracking. Use stainless steel or composite-approved fasteners (galvanized steel can stain lighter composites). If you’re recessing lights into deck boards, ensure the hole edges are sealed with waterproof silicone to prevent moisture intrusion around the fixture bezel.
Conclusion
Composite deck lighting transforms a functional outdoor surface into an inviting evening destination. By choosing the right fixture types for your layout, planning wiring and power carefully, and following straightforward installation practices, you’ll create a lit deck that’s both beautiful and safe. Start simple, post caps or rail lights are forgiving first projects, then expand with under-deck or recessed options as your confidence grows. Exterior Home Lighting: Transform your outdoor living from sunset through late night, and you’ll wonder how you ever used your deck without it.


